Py-Featでお手軽に表情認識をやってみた
Mediumのこちらの記事で、Py-Featというお手軽に表情表現(Facial Expression: FEX)を解析できるツールキットの存在を知ったのでさっそく試してみました。
今回は公式チュートリアルのうちの、画像からの表情認識をやってみました。
Py-Featとは
Py-Featは表情表現(Action Units、emotions、facial landmarks)を解析するための包括的なツールキットです。
具体的には以下の機能が提供されています。
- 画像や動画から簡単に表情表現を検出できるモデル
- 表情表現データの前処理や解析
- 表情表現データの可視化
公式ドキュメント曰く、以下の理由からPy-Featが開発されたとのことです。
However, researchers seeking to use these algorithms or tools such as OpenFace, iMotions-Affectiva, or Noldus FaceReacer may find them difficult to install, use, or too expensive to purchase. It’s also difficult to use the latest model or know exactly how good the models are for proprietary tools. We developed Py-Feat to create a free, open-source, and easy to use tool for working with facial expressions data.
ちなみにPy-FeatはPython Facial Expression Analysis Toolboxの頭文字です。
環境
本記事で紹介しているコードはDockerコンテナ上での動作を想定しています。
なお、Dockerコンテナではなくても以下のライブラリをインストール済みであれば動作するはずです。
※依存ライブラリについてはGitHubのpyproject.tomlやpoetry.lockを確認してください。
- python==”3.7″
- sklearn==”0.0″
- jupyterlab==”3.0.16″
- pandas==”1.1.5″
- numpy==”1.21.0″
- matplotlib==”3.4.2″
- py-feat = “0.3.7”
画像から表情表現(FEX)を検出してみる
まず、使用したいモデルを指定してdetectorクラスをロードします。
Py-Featで使用できるモデルは公式ドキュメントで確認できます。
※初回のモデルのダウンロードはかなり時間がかかります。
INPUT:
from feat import Detector
# rf: https://py-feat.org/content/intro.html#available-models
face_model = "retinaface"
landmark_model = "mobilenet"
au_model = "rf"
emotion_model = "resmasknet"
detector = Detector(
    face_model=face_model,
    landmark_model=landmark_model,
    au_model=au_model,
    emotion_model=emotion_model
)
ロード完了後、処理したい画像のファイルパスを指定します。
今回は写真ACの画像データを使用します。
INPUT:
from feat.tests.utils import get_test_data_path
import matplotlib.pyplot as plt
import os
from PIL import Image

# Py-Featでデフォルトで存在しているテストデータを使う場合
# test_data_dir = get_test_data_path()
# test_image = os.path.join(test_data_dir, "input.jpg")

# 写真ACからダウンロードした画像
test_image = './face.jpg'
# 画像の確認
f, ax = plt.subplots()
im = Image.open(test_image)
ax.imshow(im)
OUTPUT: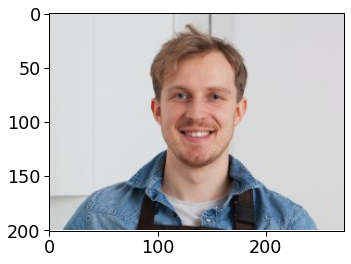
次に初期化したdetectorインスタンスを使って表情表現(FEX)を予測します。
INPUT:
image_prediction = detector.detect_image(test_image)
# Show results
image_prediction
OUTPUT:
| frame | FaceRectX | FaceRectY | FaceRectWidth | FaceRectHeight | FaceScore | x_0 | x_1 | x_2 | x_3 | … | AU28 | AU43 | anger | disgust | fear | happiness | sadness | surprise | neutral | input | |
|---|---|---|---|---|---|---|---|---|---|---|---|---|---|---|---|---|---|---|---|---|---|
| 0 | 0.0 | 102.591438 | 38.95927 | 69.803276 | 97.751617 | 0.998283 | 102.855199 | 102.414743 | 102.738646 | 103.693749 | … | 0.133741 | 0.068706 | 0.00005 | 0.00012 | 0.000029 | 0.9989 | 0.000052 | 0.000755 | 0.000095 | ./face.jpg |
1 rows × 173 columns
detect_image()ではFeXクラスが返却されます。
FeXクラスはpandas.DataFrameを継承しているので、単体で呼び出すとDataFrameが表示されます。
FeXクラスの仕様に関しては公式ドキュメントを参照してください。
最後にplot_detections()メソッドで簡単に検出結果を可視化します。
image_prediction.plot_detections()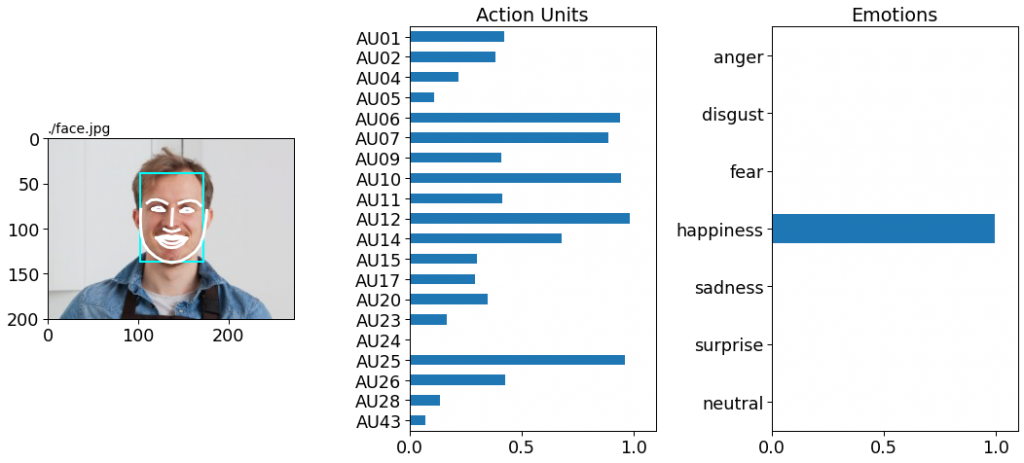
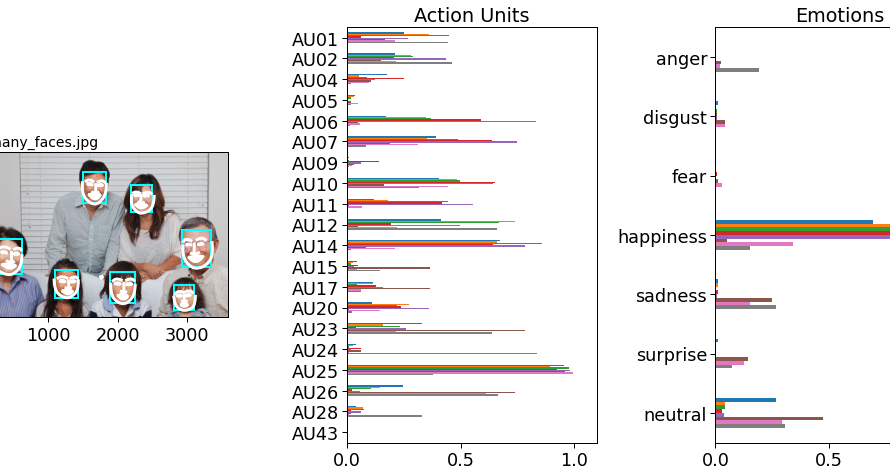
顔検出および表情認識結果と共に、活動単位(Action Units)や感情(Emotions)のスコアが可視化されます。
この画像の男性の場合は、happinessに全振りされているようです。
次に1人ではなく、複数人の表情表現データで試してみます。
こちらも写真ACの画像を使用しています。
INPUT:
# 表情表現データが複数ある画像
test_image = './many_faces.jpg'

f, ax = plt.subplots()
im = Image.open(test_image)
ax.imshow(im)
OUTPUT: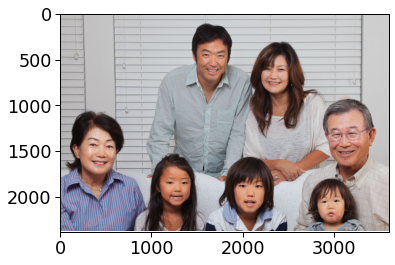
全体的に笑顔の写真ですが、右下の子供たちの表情が少し引きつっているような気がします。
先ほどと同様に表情表現(FEX)を予測し、検出結果を可視化します。
INPUT:
image_prediction = detector.detect_image(test_image)
image_prediction.plot_detections()
OUTPUT: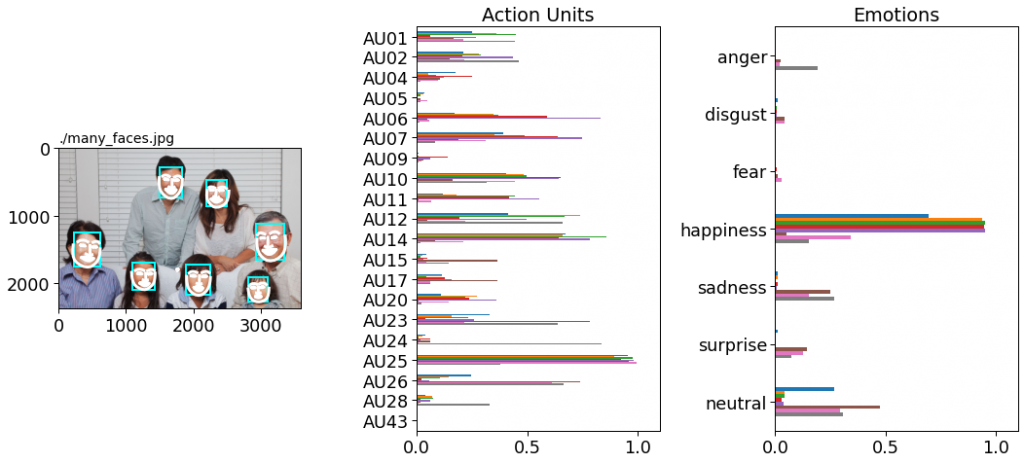
先ほどとは異なり、happinessのほかにもneutralやsadnessなどの他の感情のスコアも出ています。
実際に個々のスコアを確認してみます。
INPUT:
# Show results
image_prediction
OUTPUT:
| frame | FaceRectX | FaceRectY | FaceRectWidth | FaceRectHeight | FaceScore | x_0 | x_1 | x_2 | x_3 | … | AU28 | AU43 | anger | disgust | fear | happiness | sadness | surprise | neutral | input | |
|---|---|---|---|---|---|---|---|---|---|---|---|---|---|---|---|---|---|---|---|---|---|
| 0 | 0.0 | 218.696335 | 1238.053711 | 401.300293 | 533.293701 | 0.999880 | 218.186890 | 213.404875 | 213.563282 | 218.857212 | … | 0.140518 | 0.120219 | 0.000628 | 0.004039 | 0.002389 | 0.966033 | 0.002690 | 0.021914 | 0.002307 | ./many_faces.jpg |
| 1 | 0.0 | 2921.488770 | 1129.358521 | 433.478516 | 535.155762 | 0.999798 | 2938.369333 | 2938.814966 | 2945.722979 | 2957.771326 | … | 0.307399 | 0.460387 | 0.001392 | 0.000151 | 0.001924 | 0.944997 | 0.000414 | 0.045955 | 0.005167 | ./many_faces.jpg |
| 2 | 0.0 | 1906.350952 | 1720.287720 | 339.735962 | 456.190063 | 0.999376 | 1903.487871 | 1903.076784 | 1907.411966 | 1914.817942 | … | 0.090522 | 0.052276 | 0.140582 | 0.014811 | 0.135971 | 0.005156 | 0.196263 | 0.251628 | 0.255590 | ./many_faces.jpg |
| 3 | 0.0 | 1493.170166 | 270.268097 | 341.269043 | 473.348419 | 0.999249 | 1495.502574 | 1492.213773 | 1493.717547 | 1500.112898 | … | 0.252018 | 0.048917 | 0.008512 | 0.000068 | 0.049290 | 0.059018 | 0.134771 | 0.064657 | 0.683684 | ./many_faces.jpg |
| 4 | 0.0 | 1097.192871 | 1671.731567 | 325.657104 | 442.055542 | 0.998693 | 1086.458147 | 1090.151208 | 1097.901593 | 1109.443877 | … | 0.115706 | 0.066699 | 0.046704 | 0.001796 | 0.085217 | 0.007079 | 0.105440 | 0.125037 | 0.628726 | ./many_faces.jpg |
| 5 | 0.0 | 2823.673096 | 1921.245117 | 276.546631 | 356.049316 | 0.998558 | 2816.240339 | 2820.718265 | 2828.187120 | 2838.030863 | … | 0.088376 | 0.092767 | 0.004499 | 0.004204 | 0.105332 | 0.033467 | 0.056073 | 0.283301 | 0.513123 | ./many_faces.jpg |
| 6 | 0.0 | 2195.525391 | 439.311340 | 328.869385 | 447.197021 | 0.997257 | 2206.850567 | 2200.414091 | 2198.724188 | 2202.648996 | … | 0.190288 | 0.133562 | 0.002707 | 0.000044 | 0.032594 | 0.007298 | 0.171611 | 0.112045 | 0.673700 | ./many_faces.jpg |
FaceRectX(X座標)、FaceRectY(Y座標)より、2行目が下段右から2番目の子で、5行目が下段右から1番目の子ということが分かります。
写真を撮られることに慣れていないのか、2人ともsadnessやfearのスコアが他の人のよりも高くなっています。(顔が引きつっているのかもしれません)
一方、左右両端のおじいさん、おばさんはhappinessのスコアが0.9を超えており、笑顔を作るのが上手なことが分かります。
最後に
今まで顔認識などの画像データを扱ったタスクに取り組んだことがありませんでしたが、Py-Featを使えばかなり手軽に試せることが分かりました。
Py-Featは画像の他に動画でも使用できるので、今度試してみようと思います。
参考
- 前の記事

『行動分析学マネジメント-人と組織を変える方法論』を読んだ感想 2021.09.20
- 次の記事

Googleデータポータルのツールチップで複数のフィールドを表示する方法 2021.10.01